Diego

Oaxaca, Mexico

AI

Mexican · dinner

Tasajo: Oaxaca's Salt-Cured, Charcoal-Grilled Beef

#mexican#oaxacan#beef#grilled#cured

40m

Total time

4

Servings

kcal

medium

Difficulty

Jul 12, 2026

MISSING DETAILS.

Let an AI chef generate ingredients, steps, and nutrition for this recipe.

Related · You might also cook

Keep going.

Tacos Dorados: Crispy Fried Tacos the Mexican Way
mexicaneasy

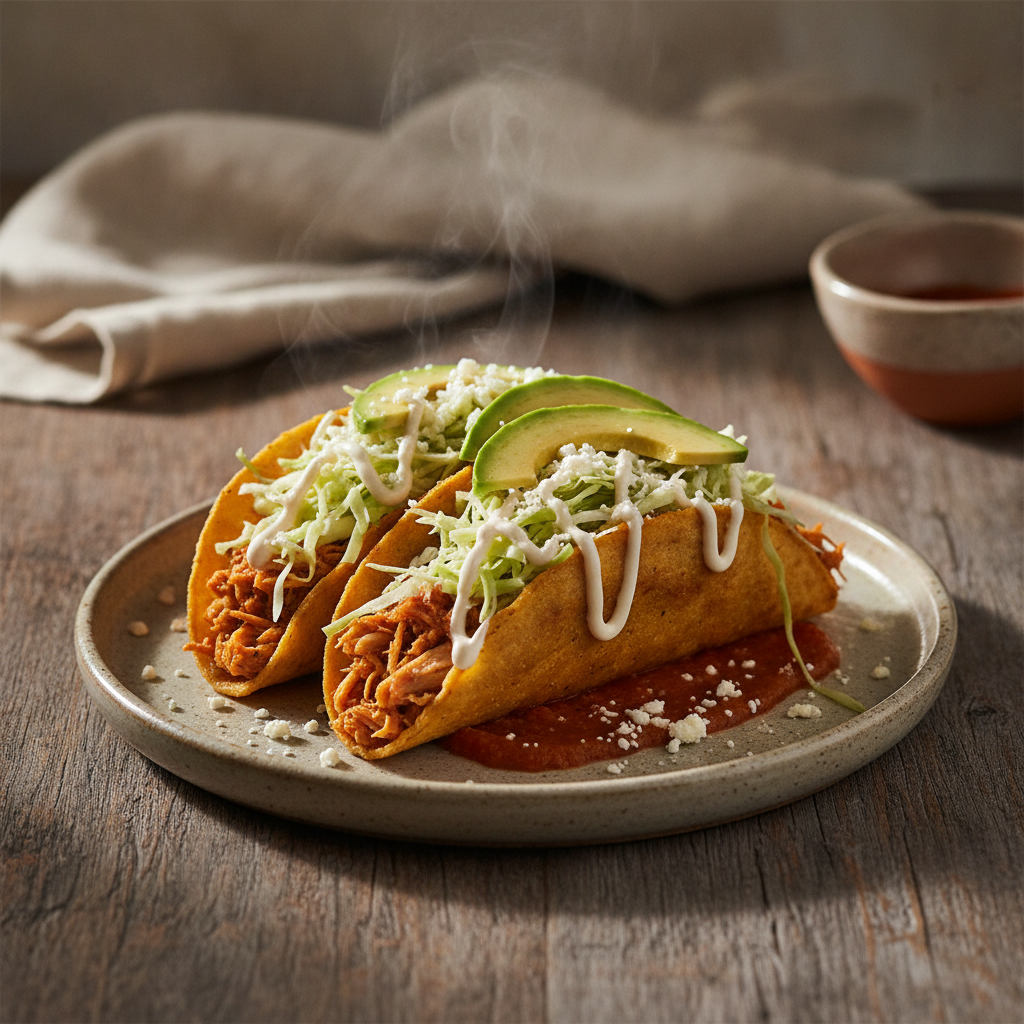
Tacos Dorados: Crispy Fried Tacos the Mexican Way

Tacos dorados are Mexico's golden fried tacos — corn tortillas folded in half around a savory filling, secured with a toothpick, and shallow-fried until they shatter with a deep, earthy masa crunch. Unlike flautas and taquitos (which are rolled into cylinders), a dorado is always folded: a half-moon that opens into toppings. These are the everyday comfort food of Mexico City lunch counters, school cafeterias, and family kitchens across Jalisco, Guerrero, and Oaxaca. The two most beloved fillings are shredded chicken (pollo deshebrado) and seasoned mashed potato — and the potato version is arguably more beloved than the meat version, especially on Fridays in Catholic Mexico. Whichever filling you use, the architecture is the same: hot, shattering golden shell on the bottom, then toppings layered in sequence — salsa first to warm against the shell, then cold shredded cabbage for crunch, cool crema in zigzags, crumbled cotija for salt, and sliced avocado over everything. Two technique points matter above all others: warm your tortillas until pliable before folding (cold corn tortillas crack in half — this is the most common failure point for home cooks), and keep your frying oil at 175–180°C. Get those two right and the rest follows naturally.

45 min 4
Read
Lomitos de Valladolid: Doña Hermelinda's Tomato-Braised Pork with Achiote
mexicanmedium

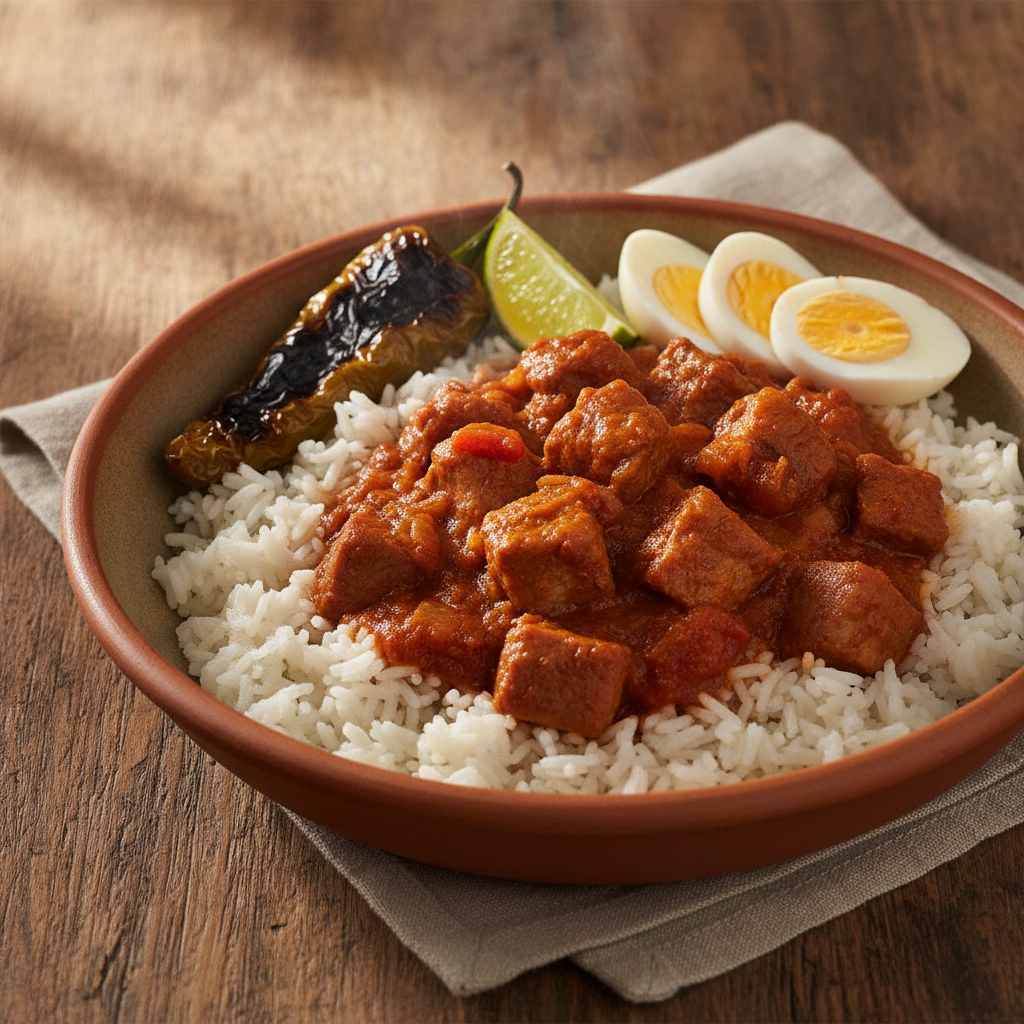
Lomitos de Valladolid: Doña Hermelinda's Tomato-Braised Pork with Achiote

Lomitos de Valladolid is one of the quiet glories of Yucatecan home cooking — not the famous cochinita pibil that fills tourist menus, but the stovetop braise that Valladolid families have been eating for lunch on weekdays for generations. Named for the colonial city in eastern Yucatán, a pueblo mágico that sits at the crossroads of the old Maya trade routes and the road to Chichén Itzá, the dish is credited by local culinary legend to Doña Hermelinda, a home cook whose recipe spread through the city's comedores and kitchens until it became synonymous with the place itself. What makes lomitos taste the way it does is layered charring at every stage. The tomatoes, onion, and garlic all spend time directly on a hot comal until they're blackened in spots — that caramelized bitterness becomes the backbone of the sauce. The pork gets browned hard in lard, building a fond on the pan bottom. Then the blended sauce goes back into that same pan and cooks down in the fat until it darkens and thickens before the pork returns. By the time the braise is done, you've built three separate Maillard layers into a single pot. This is not primarily an achiote dish — that's a common misconception that conflates lomitos with cochinita pibil. The achiote in this recipe is optional, adding a faint earthiness and the orange-red color that signals Yucatán, but the dish exists and is authentic without it. The tomato is the star. The sliced hard-boiled egg placed on top before serving is not decoration — it's a traditional textural foil, mild and cooling against the spiced pork, and it appears on every lomitos plate in Valladolid's lunch spots. Don't skip it. --- ## Ingredients ### Pork - 1½ lbs (680g) **pork loin**, cut into 3 cm (1¼-inch) cubes — pork shoulder works if the loin seems too lean - 2 tablespoons **lard** or vegetable oil (lard is traditional and gives better flavor) - 1 teaspoon fine sea salt - ½ teaspoon black pepper, freshly ground ### Tomato-Chile Sauce - 1½ lbs (680g) **ripe tomatoes** (about 4 medium; Roma or vine-ripened) - 1 medium **white onion**, halved through the root — one half for charring, one half left raw for the table - 4 cloves **garlic**, unpeeled for charring - 2 to 3 **chiles de árbol** or chile seco, stemmed (use 2 for medium heat, 3 for more) - 1 teaspoon **Yucatecan oregano**, dried — Mexican oregano is a usable substitute; the Yucatecan variety is more floral - 1 tablespoon **achiote paste (recado rojo)**, optional but traditional; dissolved in the sour orange before adding - 3 tablespoons **naranja agria** (sour orange juice) — substitute: 2 tablespoons fresh orange juice + 1 tablespoon fresh lime juice - 1 cup **water or light chicken broth** - Salt to taste ### For Serving - 2 cups **long-grain white rice**, cooked (makes about 4 cups cooked) - 2 **hard-boiled eggs**, peeled and sliced into rounds - 1 to 2 **habanero peppers**, charred whole on the comal and served on the side - 1 **lime**, cut into wedges --- ## Instructions **1. Season and dry the pork.** Pat the pork cubes completely dry with paper towels — moisture is the enemy of a good sear. Season generously on all sides with the salt and pepper. Set aside while you prepare the sauce ingredients. **2. Char the tomatoes, onion, and garlic.** Heat a dry comal or cast iron skillet over high heat until smoking. Place the tomatoes, one onion half (cut side down), and the unpeeled garlic cloves directly on the dry surface. Char, turning occasionally, until the tomatoes are blistered and blackened in spots (10–12 minutes), the onion cut face is deeply caramelized (8–10 minutes), and the garlic skin is scorched and the cloves are softened (6–8 minutes). They don't need to be uniformly blackened — you want patches of deep char, not ash. Transfer everything to a plate. Peel the garlic when cool enough to handle. **3. Toast and rehydrate the chiles.** On the same dry comal, toast the dried chiles over medium heat for 30–45 seconds per side, pressing them flat with a spatula, until they darken slightly and smell fragrant. Don't let them blacken — the seeds will turn bitter. Transfer to a small bowl, cover with hot water, and soak for 10 minutes until pliable. Drain. **4. Blend the sauce.** In a blender, combine the charred tomatoes (with any accumulated juices), charred onion half, peeled garlic, drained soaked chiles, oregano, and ½ teaspoon salt. If using achiote paste, dissolve it in the sour orange juice first, then add it to the blender. Add the sour orange juice (or orange-lime substitute). Blend until smooth, about 1 minute. The sauce will be deeply colored — brick-red to mahogany. **5. Brown the pork in batches.** In a large heavy pot or Dutch oven, heat the lard over high heat until shimmering and a drop of water sizzles on contact. Working in two batches (do not crowd the pan — crowding steams the pork instead of browning it), add the pork cubes in a single layer. Sear without moving for 3–4 minutes until deeply golden on the bottom, then turn and brown at least one more side, 2–3 minutes more. Transfer to a plate. Repeat with the second batch. The fond (browned bits) on the pan bottom is flavor — leave it. **6. Fry the blended sauce.** Reduce the heat to medium-high. Without cleaning the pot, carefully pour the blended sauce directly into the hot fat — it will splatter, so stand back and use a lid as a shield if needed. Stir to incorporate the fond from the pan bottom. Cook the sauce, stirring frequently, for 8–10 minutes until it darkens further, thickens visibly, and the raw tomato taste mellows into something deeper. The sauce is ready when it holds its shape briefly in a spoon trail. **7. Braise the pork.** Add the browned pork and any resting juices back to the pot. Pour in the water or chicken broth. Stir to coat the pork with sauce. Bring to a boil, then reduce heat to low, cover, and braise for 60–70 minutes, stirring every 20 minutes, until the pork is completely tender — it should yield easily to a fork with no resistance. In the last 10 minutes, remove the lid and raise the heat slightly to reduce the sauce to a thick, glossy consistency that coats each piece of pork. Taste and adjust salt. **8. Char the habaneros.** While the pork finishes, place the habanero peppers on the dry comal over high heat and char on all sides until blistered, 5–6 minutes. Keep them whole — the heat releases the fragrant oils but the intact skin holds back most of the fiery capsaicin. Serve them whole on the side; diners pierce or bite as desired. **9. Serve over rice with egg.** Spoon a mound of white rice into each bowl or onto each plate. Ladle the lomitos over and around the rice, making sure each portion gets plenty of sauce. Lay 2–3 slices of hard-boiled egg across the top — this is the traditional Valladolid presentation, not optional garnish. Place a whole charred habanero alongside and a lime wedge at the edge. Serve immediately. --- ## Tips **Don't skip the charring.** The charring of tomatoes, onion, and garlic is what gives this sauce its complexity. Plain simmered tomato produces a flat, acidic braise. The char adds a bittersweet depth — this step is non-negotiable. **Brown in batches, seriously.** Crowding the pan drops the oil temperature and the pork steams instead of sears. Brown in two batches minimum. **Achiote is optional, not central.** Many recipes online — especially those written outside Yucatán — portray lomitos as an achiote-forward dish. It isn't. It's a tomato braise. The achiote adds color and a faint earthiness. If you don't have recado rojo, skip it. **This dish is better the next day.** Like most braises, lomitos improves significantly after resting overnight. Reheat gently over low heat with a splash of water or broth to loosen the sauce.
100 min 4
Read
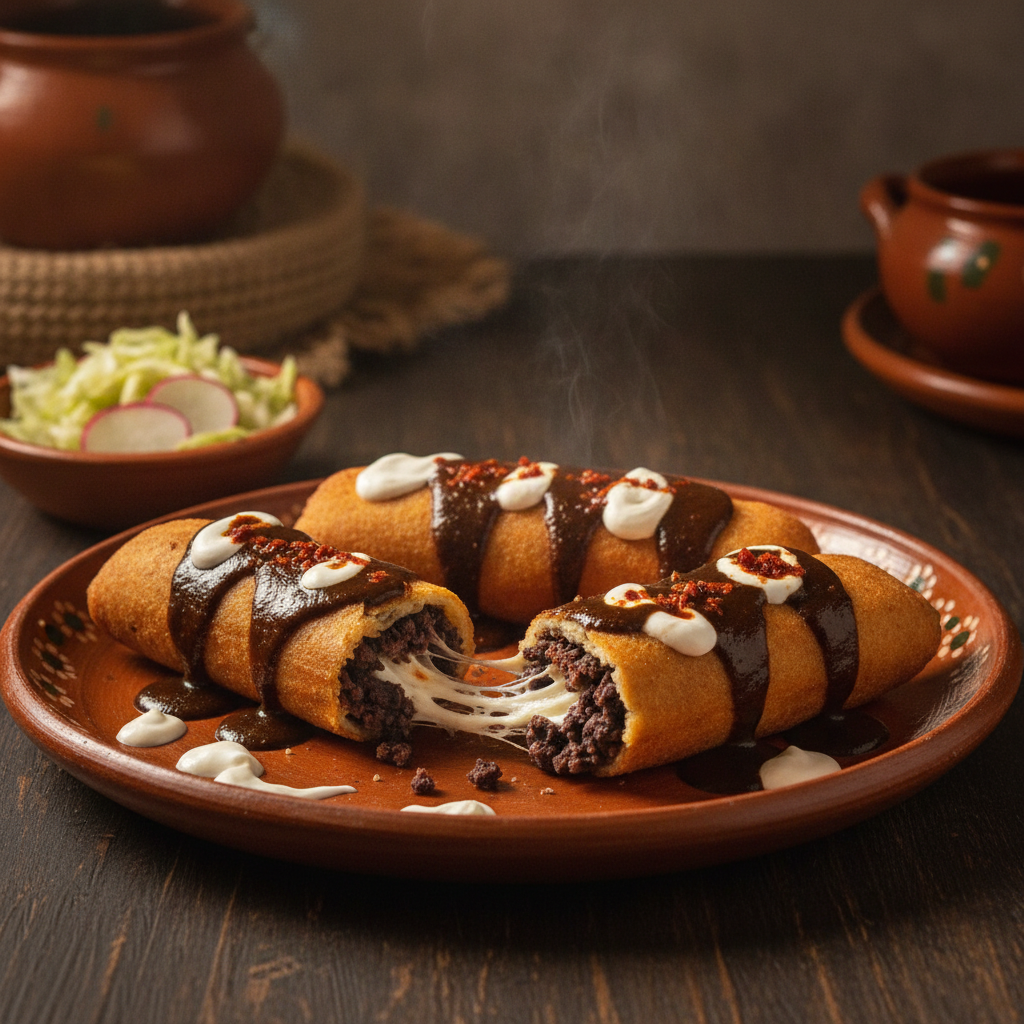
Molotes Oaxaqueños — Fried Masa Rolls with Black Bean and Chorizo
mexicanmedium

Molotes Oaxaqueños — Fried Masa Rolls with Black Bean and Chorizo

Walk through Oaxaca City as evening falls and you will smell molotes before you see them — the hot lard smell drifting from puestos in the market halls and street corners, the vendors pressing masa into their distinctive elongated shapes and lowering them into oil for the dusk crowd. Molotes are an antojito, a snack or light meal, and in Oaxaca they are definitively evening food: sold at the mercado stalls that come alive after six, eaten standing up with a paper napkin or carried away wrapped in a tortilla to eat while walking. They are the Oaxacan answer to the empanada — same concept of sealed filling inside a dough, but made with nixtamal corn masa instead of wheat, fried gold-brown, and served with crema and salsa instead of chimichurri. The name molote may derive from the elongated oval shape, sometimes compared to a football or a spindle. The form is distinct: not round like a gordita or flat like a tlayuda, but a sealed pocket with tapered ends, thick enough to hold up to frying. The black bean and chorizo filling is the classic — the combination of earthy frijoles negros and the richly spiced pork of Oaxacan chorizo negro is what you will find at every puesto. Potato and chorizo is the close second; plain black bean with epazote is the vegetarian version. The optional quesillo (Oaxacan string cheese) strip inside each molote is a variation worth trying — the mild, stretchy cheese melts into the filling and pulls when you bite in. The salsa served on top is where this dish distinguishes itself most sharply from generic Mexican antojitos. In Oaxaca, that salsa is salsa negra — made from dried pasilla negro and mulato chiles, with a deep, chocolaty, smoky character that is different from anything a green tomatillo salsa gives you. Salsa verde works fine, but if you want the authentic Oaxacan flavor, finding or making salsa negra is worth the extra step. Two technique points that separate good molotes from burst, soggy ones: the masa must be properly hydrated (pliable but not sticky), and the bean-chorizo filling must be genuinely dry before it goes in. Wet filling steams inside the sealed pocket, creates moisture pressure, and blows the seam open in the oil. Cook the filling until it holds its shape when pressed — then cook it two minutes more. --- ## Ingredients ### Masa Dough - 2 cups (240g) **masa harina** (Maseca or similar nixtamal corn flour — not coarse cornmeal or polenta) - 1¼ to 1½ cups **warm water**, added gradually - 1 tablespoon **lard** or vegetable shortening - ½ teaspoon fine **sea salt** ### Black Bean and Chorizo Filling - 1½ cups **cooked black beans (frijoles negros)**, well-drained — canned works, drain and rinse thoroughly - 6 oz (170g) **Oaxacan chorizo** (chorizo negro), casing removed — Mexican fresh chorizo is a workable substitute; Spanish cured chorizo is not - 3 sprigs **fresh epazote**, leaves only (about 1 tablespoon); or ½ teaspoon dried epazote - ½ teaspoon fine **sea salt**, plus more to taste - 1 tablespoon **lard** or neutral oil for frying the chorizo ### Optional (but recommended) - 2 oz (55g) **quesillo (Oaxacan string cheese)**, torn into 12 thin strips — low-moisture mozzarella is the closest substitute ### For Frying - 2 to 3 cups **neutral oil** or **lard**, for shallow or deep frying (lard gives more authentic flavor) ### For Serving - **Crema mexicana** (or sour cream loosened with a little whole milk) - **Salsa negra** (Oaxacan dried chile salsa) or salsa verde - Shredded cabbage or thinly sliced radishes, optional --- ## Instructions **1. Make the filling first.** Heat 1 tablespoon lard in a medium skillet over medium-high heat. Add the chorizo and use a wooden spoon to break it into small crumbles as it fries. Cook for 6–8 minutes, stirring frequently, until deeply browned and the fat has fully rendered. Add the epazote leaves and stir for 30 seconds until fragrant. **2. Mash and dry the beans into the chorizo.** Add the drained black beans to the skillet and mash roughly with a fork or potato masher — you want a textured paste, not completely smooth. Stir to combine with the chorizo and its rendered fat. Continue cooking over medium heat, stirring frequently, for 5–7 minutes until the mixture is thick, nearly dry, and holds its shape when pressed with a spoon. It should not spread or release liquid. Season with salt. Spread the filling on a plate to cool completely — warm filling will steam in the masa. **3. Mix the masa dough.** Combine the masa harina and salt in a medium bowl. Add 1 tablespoon of lard and rub it into the dry masa with your fingertips until there are no visible fat lumps. Add the warm water gradually — start with 1¼ cups, mix until a dough forms, then add more tablespoon by tablespoon until the dough is pliable and smooth. Test: press a ball of dough flat — the edges should not crack. If they crack, add a little more water. The dough should not stick to your palms. Knead gently for 1 minute. Cover with a damp towel and rest 10 minutes. **4. Divide and shape the dough.** Divide the dough into 12 equal balls (about the size of a golf ball, roughly 40g each). Keep the unused balls covered under the damp towel as you work. **5. Fill and seal the molotes.** Working one at a time, place a dough ball between two pieces of plastic (a cut zip-lock bag works well) and press or roll into a circle roughly 12 cm (5 inches) across and about 4 mm thick — slightly thicker than a tortilla. Place 1½ tablespoons of the bean-chorizo filling in the center. If using quesillo, add one strip of cheese on top of the beans. Fold the dough over the filling to form a half-moon, then press the edges firmly together, overlapping slightly and pinching to seal completely. Gently shape the sealed pocket into an elongated oval with tapered ends — the classic molote shape, like a small football. Check for any cracks or gaps in the seam and seal them with a dampened fingertip. Place on a parchment-lined tray. **6. Heat the oil.** Pour oil or lard into a heavy-bottomed skillet or Dutch oven to a depth of 2–3 cm (about 1 inch) for shallow-frying, or 5 cm (2 inches) for deeper frying. Heat over medium heat until the oil reaches 170–175°C (338–345°F). If you do not have a thermometer, test with a small piece of dough — it should sizzle immediately and float within 5 seconds. Too hot and the outside browns before the masa cooks through; too cool and the molotes absorb excess oil. **7. Fry in batches.** Working in batches of 3–4 (do not crowd the pan), lower the molotes gently into the oil using a slotted spoon. Fry for 3–4 minutes on the first side without moving, until deep golden brown. Flip carefully and fry 3–4 minutes on the second side. The thick masa needs this time — resist turning too early. Transfer to a wire rack or paper-towel-lined plate to drain. Hold finished batches in a 150°C (300°F) oven while you fry the rest. **8. Serve immediately.** Arrange the molotes on a platter or plates. Drizzle generously with crema mexicana, then spoon salsa negra or salsa verde over the top. Add shredded cabbage or radish slices alongside if desired. Molotes are street food — serve them hot and eat them immediately; they soften as they cool. --- ## Tips **Dry filling is non-negotiable.** The most common reason molotes burst in the fryer is wet filling. Steam builds inside the sealed pocket under frying heat and blows the seam apart. Cook the bean-chorizo mixture until it is paste-like and dry, then let it cool fully before filling. **Seal the seam properly.** After forming the half-moon, press the edges firmly with overlapping pressure — do not just crimp. Any crack or hole is an oil entry point that will leak filling into the fryer. Run a damp finger along any suspicious seams before frying. **Temperature control matters more than with thinner fried foods.** At 170–175°C the molotes take 3–4 minutes per side to cook the masa through. If the oil is too hot (above 185°C), the exterior is done in 2 minutes and the masa inside is still raw. Use a thermometer, or adjust heat mid-batch if the color is coming in too fast. **Salsa negra is the authentic choice.** Oaxacan salsa negra — made from pasilla negro and mulato dried chiles — has a deep, chocolaty, complex smoke that is entirely different from fresh tomatillo salsa. If you can find it prepared or the chiles to make it, the difference is significant. Salsa verde is a fine substitute but gives a different dish. **Make the filling a day ahead.** The bean-chorizo mixture keeps well refrigerated for up to 3 days and is better cold when filling the molotes (cold filling will not start melting the raw dough). The shaped, unfried molotes can be held on a tray in the refrigerator for up to 2 hours before frying.

55 min 4
Read
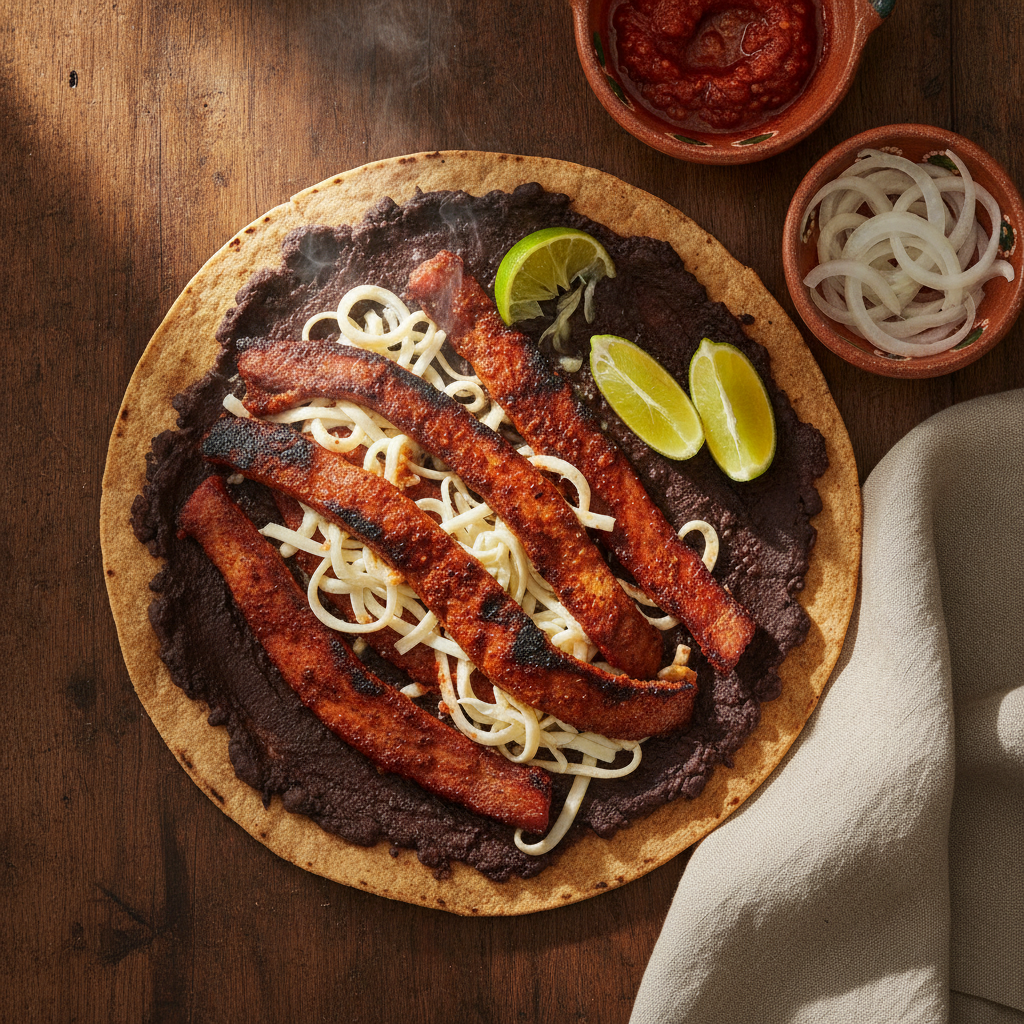
Cecina Enchilada: Oaxacan Chile-Rubbed Pork Ribbons for the Grill
mexicanmedium

Cecina Enchilada: Oaxacan Chile-Rubbed Pork Ribbons for the Grill

Cecina enchilada is the Oaxacan pork version of cecina — not to be confused with the beef cecina of Yecapixtla, Morelos. That Morelos version is salt-only, unspiced, and nationally famous. This one — the Oaxacan kind — is pork leg or shoulder rubbed in a paste of dried guajillo and ancho chiles, blended with garlic, white vinegar, and Mexican oregano, then air-dried until the surface turns from glossy to matte and slightly tacky, and grilled over fierce heat for 2–3 minutes. In Oaxaca City's markets, cecina enchilada hangs in enormous sheets at carnicerías next to tasajo and chorizo verde — the triad of Oaxacan cured meats that appear together on tlayudas across the Central Valleys. The name enchilada signals the chile treatment: it distinguishes this pork from the plain beef kind. Call it by the full name when you're describing it outside Oaxaca, or you'll be misunderstood. The recipe is an exercise in restraint applied in the right places. The adobo is deliberately simple — four dried chiles, garlic, vinegar, oregano, cumin, salt — because the objective is not a complex mole-adjacent paste but a concentrated chile coating that can dry and then char. Too much liquid in the adobo prevents the drying. Too many spices compete with what charcoal does to it. The air-drying step is where most home recipes fail: they skip it and produce adobo-marinated pork, good in itself but not cecina. The drying concentrates the paste, changes its texture from wet to tacky, and creates the substrate for the caramelization that happens on the grill. Without it, the adobo steams instead of chars. Even two hours in the refrigerator on a wire rack, uncovered, changes the result significantly. Overnight is better. The grill itself is the final step and the fastest: 2–3 minutes per side over maximum heat. At 3–4 mm, the pork cooks through almost instantly. You are not cooking the meat so much as charring the chile coating — the goal is caramelized, slightly blackened edges on the adobo crust, with the interior just cooked through. A cast-iron comal at maximum heat is a legitimate indoor alternative. --- ## Ingredients ### The Pork - **1½ lbs (680g) pork leg steaks or pork shoulder**, butterflied and sliced 3–4 mm thin — ask a Mexican butcher for *pierna de cerdo fileteada* or for *cecina verde* (unspiced thin-sliced pork). At home: place each piece between plastic wrap and pound with a meat mallet until uniformly 3–4 mm. Thickness is non-negotiable. Pork belly is too fatty; loin or leg are the right cuts. ### Chile Adobo - **4 dried guajillo chiles**, stems and seeds removed — the adobo backbone: deep red, mild-to-medium heat, slightly fruity and tannic - **1 dried ancho chile** (or mulato), stem and seeds removed — adds chocolate-raisin depth; use one per 3–4 guajillos - **1 dried pasilla negro chile**, stem and seeds removed *(optional but excellent)* — earthier and darker; some Oaxacan versions use it for a deeper paste - **4 garlic cloves**, unpeeled - **3 tablespoons white vinegar** — tenderizes, helps the paste adhere, and extends shelf life - **1 teaspoon dried Mexican oregano** (*Lippia graveolens*) — do NOT substitute Mediterranean oregano; the flavor is completely different, earthier and more citrusy - **½ teaspoon ground cumin** - **1½ teaspoons kosher salt** - **¼ cup water**, plus more as needed ### To Serve - **2 limes**, cut into wedges — required garnish, not optional - **Warm corn tortillas** or tlayuda (large toasted Oaxacan tortilla) - **Thinly sliced white onion** - **Salsa verde or salsa roja** - **Black beans** *(optional, for the tlayuda plate)* - **Quesillo** (Oaxacan string cheese) *(optional, for the tlayuda plate)* --- ## Instructions **1. Toast the dried chiles.** Heat a dry comal or heavy skillet over medium heat. Toast the guajillo, ancho, and pasilla chiles one at a time, pressing each flat with a spatula for 15–20 seconds per side until fragrant and pliable — toasted but not blackened. Transfer immediately to a bowl, cover with boiling water, and soak for 20 minutes until fully softened. Drain, reserving 2 tablespoons of the soaking liquid. **2. Roast the garlic.** In the same dry skillet, roast the unpeeled garlic cloves over medium heat, turning occasionally, for 8–10 minutes until the skins are charred in spots and the cloves are soft throughout. Let cool briefly, then squeeze the roasted cloves from the skins. **3. Blend the adobo.** Combine the drained chiles, roasted garlic, white vinegar, Mexican oregano, cumin, salt, and ¼ cup water in a blender. Blend on high for 2–3 minutes until completely smooth — the adobo should have the consistency of thick paint. Add water a tablespoon at a time if the blender needs it. Taste and adjust salt. The paste will be very thick; that is correct. **4. Pound the pork thin and coat with adobo.** If your pork is not already sliced thin, place each piece between plastic wrap and pound with a meat mallet to 3–4 mm uniform thickness. Lay the pork flat on a rimmed baking sheet. Coat both sides generously with the chile adobo, working it in with your hands for even coverage. This is a dry rub paste, not a marinade — apply a thin, even layer that adheres to the surface, not pooling in liquid. **5. Air-dry the pork (2–4 hours or overnight).** This is the step that makes cecina cecina. Place the coated pork on a wire rack set over a baking sheet. Position it in a cool, dry spot: in front of a fan for 3 hours, or uncovered in the refrigerator overnight. The surface should go from glossy to matte and slightly tacky to the touch — that is moisture leaving and the adobo concentrating. Do not cover or stack the pieces; airflow does the work. Even 2 hours makes a real difference; overnight is best. **6. Grill hot and fast.** Heat a charcoal grill, gas grill, or cast-iron comal to maximum heat — screaming hot. Lay the cecina pieces flat (work in batches if needed) and cook 2–3 minutes per side. You want a caramelized, slightly charred adobo crust with a few dark spots — the chile sugars should visibly blacken at the edges. At this thickness the pork cooks through almost instantly. Remove to a warm plate immediately. **7. Rest and serve.** Let the cecina rest 2 minutes off the heat. Squeeze lime generously over each piece immediately before eating — this is not optional. **For the Oaxacan tlayuda plate:** spread black beans on a toasted tlayuda, top with cecina, add quesillo, and serve with salsa roja. **For tacos:** slice the cecina into strips, pile into corn tortillas with raw white onion and salsa verde. Lime always. --- ## Tips **Thickness is everything.** 3–4 mm only. Thicker cuts won't dry properly and will steam rather than char on the grill. A Mexican carnicero who does cecina will know exactly what you need if you ask for *pierna fileteada para cecina*. **Do not marinate — adobo is a dry rub paste.** Excess moisture defeats the air-drying step and produces a soft, steamed result instead of the firm, lightly chewy texture that defines the dish. If the paste is pooling and wet, reduce the water and let it sit longer. **Cast-iron comal for indoor cooking.** A cast-iron comal or large skillet at maximum heat is an excellent indoor alternative to a grill. The thermal mass sears the thin pork almost instantly and delivers real caramelization on the adobo crust. **Leftover adobo paste.** Any unused adobo keeps refrigerated for 2 weeks or frozen for 3 months. Use it on chicken thighs, beef skirt steak, or roasted vegetables.

40 min 4
Read